Requirements
Broadly speaking we desired search capability for our existing customers and potential customers. We know that most of our visitors fit into one of 2 classes;
Class A. Customers looking for help
Class B. Potential and existing customers looking for product information and updates.
The search engine implementation should focus primarily on helping these classes of user.
Categorization
The keyoti.com web-site has 4 distinct areas;
1. Product Pages
2. Product Help/API Documentation
3. The Forum
4. The Knowledge Base (KB)
It is expected that areas 2, 3 and 4 will be useful to users in "Class A" and area 1 will be useful to users in "Class B". Regardless of type of user, it is expected that most users will be looking for information related to a specific product. Each product has pages spanning the 4 areas of the web-site.
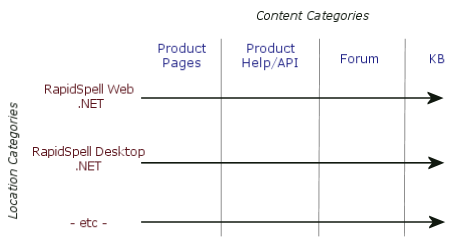
The key differences between "Content Categories" and "Location Categories" in the search engine, are;
Location Categories: a document can only belong to one category at a time, users can only search within one category at a time, or all categories. Documents can be easily assigned to locations based on their URL, as well as by meta tags.
Content Categories: a document can belong to multiple categories and users can search within any number of categories at a time. Documents can be assigned to content categories by meta tag or using a plug-in.
With that in mind, it made sense to create 4 "Content Categories", one for each area of the site ("Product Pages", etc) and to create a "Location Category" for each product. This means that users can search all products, or just one at a time, and can search any combination of web-site areas (content categories).
SearchBox
Our web-site consists of dynamically produced, but static HTML pages, as well as ASPX and ASP pages. This means that we can not use the SearchBox control on all pages, but instead need an alternative solution (see implementation below).
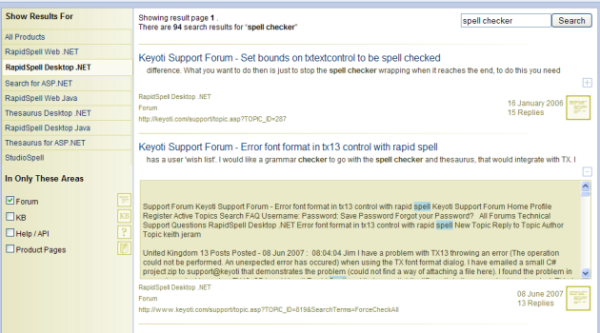
SearchResults
The results should list available products and web-site areas on the left of the results, allowing the user to drill down into the results. Result items should include a preview and relevant information about the page.
Implementation
General Importation
The first issue that we came across was that the 3rd Party forum and KB software did not crawl well. This was because they used post-backs or form POST (our forum is ASP) to navigate. The crawler needs plain links as it is not Javascript capable. To get around this problem, we modified the source code for these applications to output hidden links. Eg.
<!--
href="page2.asp"
-->
The links would allow the crawler to navigate all pages.
The second issue was that the forum has several ways to view a topic, including 'reply', 'post', 'search' and also a member 'pop profile' page. None of these pages seemed useful as search results, and seemed to clutter the results with essentially duplicate info. To avoid this we set the "Path matches to be ignored" under "More options" on the import form, to include the URLs;
/support/search.asp
/support/post.asp
/support/pop_profile.aspx
With these changes our entire site was linked together, and could be imported by crawling the Start URL https://keyoti.com/
Categorization
Each product name is used to create a distinct Location Category. Pages from each of the 4 types of content are assigned to a Content Category using differing methods that are most convenient.
We create the 4 Content Category types in the Index Manager Tool;
"Product Pages", "Help / API", "Forum" and "KB"
Forum
Our embarrassingly old, 3rd Party forum software is actually ASP, but it gets the job done. We want topics for each product to belong to the product's Location Category. In the forum ASP code, we identified a string holding the sub-forum's subject, and simply outputted a META TAG with the location specified.
If Forum_Subject <> "" Then
	Response.Write " <meta name='Keyoti_Search_Location_Category' content='" & Forum_Subject & "'  /> "
End If
With this change, the HTML for the forum renders with the meta tag present, which means that the engine will import the page and assign it to a Location Category matching the sub-forum subject (which we had conveniently already named after the product name).
While at that code location in the forum, it was obvious that we could easily write out some Custom Data, from the forum DB, specifically the topic date and number of replies – which might be useful in the results.
If Topic_Date <> "" And Topic_Replies <> "" Then
	Response.Write " <meta name='Keyoti_Search_Custom_Data' content='date=" & Topic_Date & ";replies
=" & Topic_Replies & "'  /> "
End If
So, each topic page in the forum will have a location assigned to it matching the product name, all that remains is to modify the global header of our forum software to include the Content Category, "Forum":
<meta name='Keyoti_Search_Content_Categories' content='Forum' />
That this is all working can easily be tested with a quick import of the forum from the Windows Index Management Tool. The Manage content/location categories button shows the document's being assigned properly, and a test search also gives us the Custom Data (scroll to the right) we added.
KB
Our 3rd Party KB software includes source code, so we're easily able to add in our META TAGS, just like in the forum. Again, the KB category names are also our product names. It's worth noting here that the names used must all be identical. I.e. if the KB had a category named "RapidSpell Web ASP.NET" and the forum had one named "RapidSpellWeb .NET" then we would end up with 2 different Location Categories in the search, which is undesirable. Of course, in a system designed from scratch the product name/forum subject/KB category/search location would all come from the same place, and the result would be much more fool-proof. We don't have the luxury of redesigning our KB and forum, so we have to rely on our own discipline to keep things orderly (not difficult as we don't have hundreds of products).
As with the forum, we found that we can easily write the date of the KB article, as Custom Data
<%=
date != null ? "<meta name='Keyoti_Search_Custom_Data' content='date="+date+"'  />" : ""

%>
"Product Pages" And "Help / API"
For the Location Category, this is easy. Our products sit under their own subfolders, like this
RapidSpell Desktop .NET
https://keyoti.com/products/rapidspell/dotNet/RapidSpell Web ASP.NET
https://keyoti.com/products/rapidspell/dotNetWeb/
so we can easily assign the correct "Location Root" to each Location using the "Manage content/location categories" button in the Index Management tool. Eg.
For RapidSpell Desktop .NET
Location Root=/products/rapidspell/dotNet/
This means that all product pages under /products/rapidspell/dotNet/ will be assigned to the location "RapidSpell Desktop .NET" as they are imported (therefore it's helpful to set the Location Root before importing these pages – but, if they're already imported, the "Assign Locations" button can be used to reassign).
Content Category assignment is not so easy in this case. It is of course possible to add a META TAG to do this, however our product pages and also help pages are generated HTML. So, to add meta tags to everything, we would have to regenerate all of the site and help (there are thousands of help pages alone). Rather than do this, and for the sake of instruction, we will use a plug-in to do the content assignment (note that plug-ins can also assign Location categories and do a whole host of other things). When a plug-in is defined in the Index Directory configuration, any imported pages can be assigned to a content category by the logic defined in the plug-in. Also, the "Manage content/location categories" page will activate the "Assign Contents" button, to allow retroactive assignment of documents to categories.
Creating the plug-in for Content assignment
The Help has much more info on this, but it's fairly straightforward.
1. Create a Class Library project.
2. In it, add a reference to Keyoti2.SearchEngine.Core.DLL
3. Create a class called "ExternalEventHandler" and paste the basic plugin structure
using System;
using System.Collections;
using System.Text;
using System.IO;
using Keyoti.SearchEngine.Events;
using Keyoti.SearchEngine.Documents;
using Keyoti.SearchEngine.DataAccess;
using Keyoti.SearchEngine;

namespace Keyoti.SearchEngine
{
    /// <summary>
    /// Used for content assignment at keyoti.com
    /// </summary>
    public class ExternalEventHandler
    {
        IEventDispatcher dispatcher;
        Configuration conf;
        public ExternalEventHandler(IEventDispatcher dispatcher, Configuration conf)
        {
            Keyoti.SearchEngine.DataAccess.Log.WriteLogEntry("Plugin", "Initialized", conf);
            dispatcher.Action += new ActionEventHandler(dispatcher_Action);
            dispatcher.NeedObject += new NeedObjectEventHandler(dispatcher_NeedObject);
            this.dispatcher = dispatcher;
            this.conf = conf;
        }


        public void DetachHandlers()
        {
            if (dispatcher != null)
            {
                dispatcher.Action -= new ActionEventHandler(dispatcher_Action);
                dispatcher.NeedObject -= new NeedObjectEventHandler(dispatcher_NeedObject);
            }
        }


        public void dispatcher_Action(object sender, ActionEventArgs e)
        {

        }

        public void dispatcher_NeedObject(object sender, NeedObjectEventArgs e)
        {

        }
    }
}
4. To assign content categories, we need to handle the AutoAssignContent 'event' in dispatcher_Action, and use our own logic to specify the content name – it's important to match the name with the existing category name EXACTLY, otherwise a new category is automatically created.
        public void dispatcher_Action(object sender, ActionEventArgs e)
        {
            if ((e.ActionData.Name == ActionName.AutoAssignContent))
            {
                Keyoti.SearchEngine.DataAccess.DocumentRecord rec;
                Keyoti.SearchEngine.DataAccess.XmlDataAccess da;
                rec = ((Keyoti.SearchEngine.DataAccess.DocumentRecord)(e.ActionData.Data));
                da = ((Keyoti.SearchEngine.DataAccess.XmlDataAccess)(sender));
                //Our logic for content assignment
                if (rec.Uri.AbsoluteUri.ToLower().Contains("documentation") ||
                    rec.Uri.AbsoluteUri.ToLower().Contains("help") ||
                    rec.Uri.AbsoluteUri.ToLower().Contains("userguide") ||
                    rec.Uri.AbsoluteUri.ToLower().Contains("api"))
                {
                    rec.ContentCategories.Add(da.GetContentCategoryRecord("Help / API"));
                } else if(
                    rec.Uri.AbsoluteUri.ToLower().Contains("/products/")
                    ){
                    rec.ContentCategories.Add(da.GetContentCategoryRecord("Product Pages"));
                }
            }
        }
5. Once the plug-in DLL is ready, we copy the DLL to our Index Directory (you can reference it where it sits in the plug-in project bin if you prefer, by setting either absolute or relative path in the "EventHandlerAssemblyPath" under Configuration). We copy the DLL to the Index Directory, so the path to set in EventHandlerAssemblyPath is just the name of the DLL that we created (Search2010Plugin.dll). While in the Configuration, enable logging, so that you can check on the plug-in when it runs.
6. Since logging is enabled and everything was OK, there was an entry in CentralEventDispatcher.txt like this created when the Configuration form is closed.
02/02/2010 16:51 Success, initialized external event handler assembly @ C:\Search2010\IndexDirectory\Search2010Plugin.dll
7. Tested it by importing some product pages and verify that they are assigned correctly.
Tip:
All of the configuration/setup for the index and its categories is stored in the XML files inside the index directory – so
to keep a back up, or to move it around just copy those files.
SearchBox
We used the following technique to use HTML directly (actually we also have the search textbox in our menu JS, but it's beyond the scope of this article and very specific to our menu system).
https://keyoti.com/kb/Default.aspx?ToDo=view&questId=149&catId=54
Besides that, there were no specific customizations.
SearchResult
The SearchResult control is used to display the results, with some tweaks to the templates and an additional column for category selection.
Category Selection
As previously described, the results page should include options to ‘drill down' into results for one product and/or specific areas of the web-site. To achieve this, a column was added to the left side of the SearchResult control, and in it 2 placeholder controls were added;
<p class="searchLocationHeader">Show Results For</p>
<asp:PlaceHolder ID="locationButtonPH" Runat="server" />
<p class="searchLocationHeader">In Only These Areas</p>
<asp:PlaceHolder ID="contentCheckBoxesPH" Runat="server" />
The placeholders will have LinkButton and CheckBox controls added at runtime. We chose to add them dynamically in this way so as to be able to generate them from the Location and Content categories actually present in the index (making maintenance in future easier).
The categories are returned by two properties, which cache the location/content names in the user's Session, and load them initially from the index using DocumentIndex.
string[] LocationNames
{
	get
	{
		string[] names = Cache["locationNames"] as string[];
		if(names==null)
		{
			Keyoti.SearchEngine.Index.DocumentIndex idx;
			idx = new Keyoti.SearchEngine.Index.DocumentIndex(SearchResult1.Configuration);
			LocationCategoryRecord[] records;
			LocationCategoryRecord defaultLoc;
			try
			{
				records = idx.GetLocationCategoryRecords();
				defaultLoc =
					LocationCategoryRecord.CreateDefaultLocationCategoryRecord();
			}
			finally
			{
				idx.Close();
			}

			names = new string[records.Length];
			for(int i=0; i<records.Length; i++)
			{
				if(records[i].Name==defaultLoc.Name)
					names[i] = "All Products";
				else names[i] = records[i].Name;
			}
			Cache["locationNames"]=names;
		}
		return names;
	}
}

string[] ContentNames
{
	get
	{
		string[] names = Cache["contentNames"] as string[];
		if(names==null)
		{
			ContentCategoryRecord[] records;
			ContentCategoryRecord defaultCon ;
			Keyoti.SearchEngine.Index.DocumentIndex idx;
			idx = new Keyoti.SearchEngine.Index.DocumentIndex(SearchResult1.Configuration);
			try
			{
				records = idx.GetContentCategoryRecords();
				defaultCon =
					ContentCategoryRecord.CreateDefaultContentCategoryRecord();
			}
			finally
			{
				idx.Close();
			}

			names = new string[records.Length-1];
			for(int i=0,p=0; i<records.Length; i++)
			{
				if(records[i].Name!=defaultCon.Name)
					names[p++] = records[i].Name;
			}
			Cache["contentNames"]=names;
		}
		return names;
	}
}
Every time the page is loaded, it's necessary to create the location/content option controls.
private	 .EventArgs e)
{
	SearchResult1.IndexDirectory=MapPath("IndexDirectory");
	SearchResult1.ItemCreated+=new SearchResultItemEventHandler(SearchResult1_ItemCreated);

	CreateLocationButtons();
	HighlightLocationButton();

	CreateContentCheckBoxes();
	HighlightContentCheckBoxes();
}

void CreateLocationButtons()
                                {
                                                foreach(string name in LocationNames)
                                                {
                                                                LinkButton button = new LinkButton();
                                                                button.ID=name+"LinkButton";
                                                                button.Text=name;
                                                                button.CssClass = "content_link";
                                                                button.Click+=new EventHandler(LocationButtonClick);
                                                                locationButtonPH.Controls.Add(button);
                                                }
                                }


                                void CreateContentCheckBoxes()
                                {
                                                Table t = new Table();
                                                t.Width=new Unit(100, UnitType.Percentage);
                                                contentCheckBoxesPH.Controls.Add(t);
                                                foreach(string name in ContentNames)
                                                {
                                                                //want to have table with the checkbox left aligned and the icon right aligned
                                                                TableRow tr = new TableRow();
                                                                t.Rows.Add(tr);
                                                                tr.CssClass="location_cb";


                                                                TableCell td = new TableCell();
                                                                td.Width=new Unit(70, UnitType.Percentage);
                                                                CheckBox cb = new CheckBox();
                                                                cb.ID=name+"CB";
                                                                cb.Text=name;

                                                                cb.Visible=true;
                                                                cb.AutoPostBack=true;
                                                                cb.CheckedChanged+=new EventHandler(ContentCheckBox_CheckedChanged);
                                                                td.Controls.Add(cb);

                                                                tr.Cells.Add(td);


                                                                td = new TableCell();
                                                                td.HorizontalAlign= HorizontalAlign.Right;
                                                                td.Width=new Unit(30, UnitType.Percentage);
                                                                System.Web.UI.WebControls.Image img = new System.Web.UI.WebControls.Image();
                                                                img.ImageUrl = GetSmallContentIcon(name);
                                                                img.AlternateText=name;
                                                                td.Controls.Add(img);
                                                                tr.Cells.Add(td);


                                                }
                                }
Where CreateLocationButtons creates LinkButton controls for each string returned by LocationNames, and CreateContentCheckBoxes creates CheckBox controls for each string returned by ContentNames.
The Highlight* methods just change the CSS class of, or check the controls if they are currently selected, as determined by looking at the SearchOptions property in SearchResult control.
void HighlightLocationButton()
{
	LinkButton allButton=null;
	bool foundCat=false;
	foreach(LinkButton lb in locationButtonPH.Controls)
	{
		if(lb.Text=="All Products")
			allButton=lb;
		if(lb.Text==SearchResult1.SearchOptions.LocationCategoryName)
		{
			lb.CssClass = "content_link_selected";
			foundCat=true;
		}
		else
			lb.CssClass = "content_link";
	}
	//if didn't find it, it must be all.
	if(!foundCat && allButton!=null)allButton.CssClass = "content_link_selected";
}


void HighlightContentCheckBoxes()
{
	string[] contents = SearchResult1.SearchOptions.ContentCategoryNames;
	if(contents!=null)
	{
		foreach(string contentName in contents)
		{
			CheckBox lb =
				contentCheckBoxesPH.FindControl(contentName+"CB") as CheckBox;
			lb.Checked=true;
		}
	}
}
The LinkButton and CheckBox controls are hooked up to regular ASP.NET event handlers, and their Click handlers call ApplyLocationFilter/ApplyContentFilter methods;
void LocationButtonClick(object sender, EventArgs e)
{
	selectedButton = (sender as LinkButton).Text;
	ApplyLocationFilter(selectedButton);
	HighlightLocationButton();

	//reset page to 1
	SearchResult1.ResultsPage = 1;
}

void ContentCheckBox_CheckedChanged(object sender, EventArgs e)
{
	ApplyContentFilter((sender as CheckBox).Text, (sender as CheckBox).Checked);

	//reset page to 1
	SearchResult1.ResultsPage = 1;
}

void ApplyLocationFilter(string name)
{
	SearchResult1.SearchOptions.LocationCategoryName = name;
}
The location filter is very simple to apply, because the user can only select one location at a time, so we just set the name, per the button text that the user clicked. Note that when the name specified is not an existing location, the search automatically searches all locations, so if the name is "All Products" then it will search all locations, for example.
The content filter is more complicated to apply, because the user can select multiple categories, and, the CheckBox click event will only indicate a change (i.e. addition/subtraction of a category to search in). To do this it distinguishes between adding (check=true) and removing a category. The method looks at the current ContentCategoryNames set in the SearchOptions and changes this array.
void ApplyContentFilter(string contentCategoryName, bool check)
{
	if(check) //add this name
	{
		//look to see if already exists
		bool found=false;
		for(int i=0; SearchResult1.SearchOptions.ContentCategoryNames!=null &&
i<SearchResult1.SearchOptions.ContentCategoryNames.Length;i++)
			if(SearchResult1.SearchOptions.ContentCategoryNames[i]==contentCategoryName)
				found=true;
		if(!found)
		{
			//doesn't exist so create new array with new name on end
			string[] newNames;
			if(SearchResult1.SearchOptions.ContentCategoryNames==null)
				newNames= new string[1];
			else
				newNames=
				new string[SearchResult1.SearchOptions.ContentCategoryNames.Length+1];
			for(int i=0; i<newNames.Length-1;i++)
				newNames[i] = SearchResult1.SearchOptions.ContentCategoryNames[i];
			newNames[newNames.Length-1]=contentCategoryName;
			SearchResult1.SearchOptions.ContentCategoryNames = newNames;
		}
	}
	else //remove this name
	{
		bool found=false;
		for(int i=0; SearchResult1.SearchOptions.ContentCategoryNames!=null &&
i<SearchResult1.SearchOptions.ContentCategoryNames.Length;i++)
			if(SearchResult1.SearchOptions.ContentCategoryNames[i]==contentCategoryName)
				found=true;
		if(found)
		{
			//exists so create new array with new name on end
			string[] newNames =
				new string[SearchResult1.SearchOptions.ContentCategoryNames.Length-1];
			for(int i=0, p=0; i<SearchResult1.SearchOptions.ContentCategoryNames.Length;i++)
			{
				if(SearchResult1.SearchOptions.ContentCategoryNames[i]!=contentCategoryName)
					newNames[p++] = SearchResult1.SearchOptions.ContentCategoryNames[i];
			}
			SearchResult1.SearchOptions.ContentCategoryNames = newNames;
		}
	}

	//if there are no content's specified then set to null to indicate ALL.
	if(SearchResult1.SearchOptions.ContentCategoryNames!=null &&
SearchResult1.SearchOptions.ContentCategoryNames.Length==0)
		SearchResult1.SearchOptions.ContentCategoryNames=null;
}
ResultItem Template Customization (Using Custom Data)
We want the result item to include some customizations;
- An icon showing the area of the website that the page is from
- The date of the page for KB and forum posts
- The number of replies for forum posts
The template is adjusted to allow these entries (highlighted in bold) as well as some cosmetic changes;
<ResultItemTemplate>
	<div class='SEResultItem'><table border="0" width="100%">

		<tr>

			<td class="resultDivider" colspan="2"><img src="search-divider.jpg" /></td>

		</tr>

		<tr>

			<td class='SEResultItemLink' colspan="2" style='font-family:sans-serif, Verdana, Arial, Helvetica;'>

			<a class='resultTitleLink' href="<%# Container.Uri %>">

				<%# Container.Title %>

			</a>

			</td>

		</tr>

		<tr>

			<td class='SEResultItemSummary' colspan="2" style='font-family:sans-serif, Verdana, Arial,
 Helvetica; font-size:0.8em; '><%# Container.Summary%>

		</td>

		</tr>

		<tr>

			<td align="right" colspan="2">

				<span class='sew_previewResultWrapper'>
					<img alt="Click to preview the document text"
src="<%# Container.ResultPreview_Expander_ClosedUrl%>"onclick="sew_toggleResultPreview(this,
'<%# Container.UriAsStored %>', '<%#Container.ResultPreview_Expander_ClosedUrl %>',
'<%# Container.ResultPreview_Expander_OpenedUrl %>')"/>
				<span class='sew_previewResultContent_Custom'>Loading document...</span>
					</span>

			</td>

		</tr>

		<tr>

			<td class='SELocation'><%# Container.Location %></td>

			<td rowspan="3" align="right">

				<table border='0'>

		<tr>

			<td>

                            <asp:PlaceHolder Runat="server" ID="resultInfoHolder" />

			</td>

			<td width="40">

                            <asp:Image Runat="server" ID="resultImage" /></td>

		</tr>

			</table>

			</td>

		</tr>

			<tr>

				<td class='SEContent'>

					<%# Container.Content %>

				</td>

		</tr>

		<tr>

			<td class='SEResultItemURL'><%# Container.Uri %></td>

		</tr>
	</table>
	</div>
</ResultItemTemplate>
To actually specify the image URL etc, we handle the SearchResult.ItemCreated event (which is fired for every item in the SearchResult as it is created, including header, footer and each result), and in that handler, look at the CustomData (for date and # of replies) and the content category (for icon image URL);
private void SearchResult1_ItemCreated(object sender, Keyoti.SearchEngine.Web.SearchResultItemEventArgs e)
{
…
…

	if(e.Item is Keyoti.SearchEngine.Web.ResultItem)
	{
		//Get the place holder control where the
		//# of replies and page date may be added
		PlaceHolder holder = e.Item.FindControl("resultInfoHolder") as PlaceHolder;
		Keyoti.SearchEngine.Search.ResultItem resultItem = e.Data as Keyoti.SearchEngine.
Search.ResultItem;

		//Get the icon image control
		System.Web.UI.WebControls.Image img = e.Item.FindControl("resultImage") as
System.Web.UI.WebControls.Image;
		//derive the icon URL, based on the content name (just simple mapping)
		img.ImageUrl=GetPrimeContentIcon(resultItem.Content);

		if(img.ImageUrl==null || img.ImageUrl.Length==0)img.Visible=false;

		img.AlternateText="This result is from the "+resultItem.Content+" section";

		//if there is custom data, parse it to obtain date and # of replies
		if(resultItem.DocumentRecord.CustomData.Length>0)
		{
			StringDictionary bonusData = GetBonusData(resultItem.DocumentRecord.CustomData);
			if(bonusData.ContainsKey("date"))
			{
				Label dateLabel = new Label();
				dateLabel.Text=bonusData["date"];
				dateLabel.CssClass="sew_result_date";
				holder.Controls.Add(dateLabel);
			}
			if(bonusData.ContainsKey("replies"))
			{
				Label repliesLabel = new Label();
				repliesLabel.Text=bonusData["replies"] + (bonusData["replies"]=="1"?" Reply":" Replies");
				repliesLabel.CssClass="sew_result_replies";
				holder.Controls.Add(repliesLabel);
			}
		}
	}
}
Header Template Customization
The header includes a SearchBox, and SearchSuggestions (spelling) control. These can be simply added to the Header template;
<HeaderTemplate>
	<DIV class="SEHeader" >
		<TABLE width="100%" border="0">
			<TR>
				<TD>Showing result page <B>
						<%# Container.ResultsPage %>
					</B>.
					<BR>
					There are <B>
						<%# Container.NumberOfResults %>
					</B>search results for "<B><%# Container.QueryExpression %></B>"
					<br />
					<i>
						<%# Container.IgnoredWordsMessage %>
					</i>
				</TD>
				<TD align="right" valign="top">
                            <SearchEngine:SearchBox id="Searchbox1" runat="server" ResultPageURL="."
AutoCompleteQueryIndexDirectory="~/IndexDirectory"
						AutoCompleteQuery="false"
						AutoCompleteQueryShowNumberOfResults="False"
						AutoCompleteQueryFailSilent="False"
						RememberQuery="false">

					</SearchEngine:SearchBox>
				</TD>
			</TR>
			<tr>
				<td colspan='2'>
                            <SearchEnginePro:SearchSuggestions id=SearchSuggestions1 runat="server"
CustomDictionaryPath='<%# MapPath("custom_dictionary.txt") %>'>

					</SearchEnginePro:SearchSuggestions></td>
			</tr>
		</TABLE>
	</DIV>
</HeaderTemplate>
The interesting settings for these controls are that in SearchBox we have set RememberQuery to false, this is because we want to specify the text in the text box ourselves; also the SearchSuggestions control has a CustomDictionaryPath specified which includes our customizations (e.g.. the word "Keyoti").
We want to specify the SearchBox text ourselves, because it won't automatically pick up the last query entered, because we have used a custom search box built into our menu strip, that doesn't do "RememberQuery". The SearchBox is in the Header (and NoQueryTemplate by default), so we use the ItemCreated event handler to set the text.
private void SearchResult1_ItemCreated(object sender, Keyoti.SearchEngine.Web.SearchResultItemEventArgs e)
{

	if(e.Item is Keyoti.SearchEngine.Web.Header || e.Item is Keyoti.SearchEngine.Web.NoResults)
	{

		SearchEngine.Web.SearchBox sb = e.Item.FindControl("Searchbox1") as SearchEngine.Web.SearchBox;
		if(sb!=null && SearchResult1.QueryExpression!=null)
			sb.QueryTextBox.Value=SearchResult1.QueryExpression;

		//we want the search in the header to be within the already specified categories
		if(sb!=null)
			sb.SearchOptions = SearchResult1.SearchOptions;

	}
	...
Creating & Maintaining The Index
The index was imported using the Windows Index Management tool, it took a couple of hours to import all 10,000 pages, and the first import successfully assigned all pages to their correct content/location category. Of course the web-site is always changing and we needed an update strategy. For customers with a CMS system, it is desirable to use our DocumentIndex.AddDocument method to instantly add a document to the index, as the document is created. This isn't possible for us, since our web-site doesn't have a CMS and pages are created using our static page generator, our ASP forum and our ASP.NET KB software.
Periodic Updates
By setting up the Windows Service included in the Pro version of SearchUnit, it's possible to reimport the web-site at specific intervals. The import frequency should be balanced between load demand on the server, and the need for up to date results. Our index is updated weekly, as content does not change that rapidly on the web-site.
Addition Of New Products
In the future, as the web-site changes, the search setup will need to adapt as well. Simple page additions/deletions are automatically handled by the service reimports. However 2 types of change to the web-site are not automatically handled;
- Creation of a new ‘area'; this could be something to compliment the existing areas (products, help, forum, KB), such as a blog for example.
- New products
When a new ‘area' is added to the site, we will need to revisit the ‘categorization' section above, and identify a suitable strategy (which would more than likely just be the inclusion of a meta tag specifying the new content category name). When the indexer is told that a document belongs to a category that it doesn't already know about, it creates the category, this means that the search results page is automatically updated (since the CheckBox controls are dynamically generated based on the index content).
When a new product is added to the site, a new location category will need to be added to the index. The location categories are currently defined with a "Location Root" that specifies the common URL path of pages in that product ‘location'. For example, if a new product ("ProductA") is created and it's pages are uploaded to /products/producta/, then a Location will be created called "ProductA" with location root = "/products/producta/". Again, this will automatically update the search result page.